Sunday, November 3, 2013

Turkey time!

Oh my goodness, time is flying! I haven't prepared a design for you since summer! So, without further ado, here's a turkey in time for Thanksgiving!

The size of the file is 144 stitches x 144 stitches...if you work on 18-point, it should be just right for the 8 1/2 side of an 8 1/2 x 11" frame...fill in the rest with family sayings, or the date!

'Til the next time, have fun stitching this design based on a free Microsoft image (thanks, Microsoft) for your personal non-commercial stitching fun!

Thursday, August 15, 2013

Ferragosto, Italy's most important summertime holiday

Happy Ferragosto!

The 15th of August in Italy is celebrated as the most important summertime holiday. The lay spirit of the most intensely lived no-work day of relax prevails, though,...More......

...for Catholic believers, it's also a religious holiday (the assumption into heaven of the Blessed Virgin Mary).

Because of the crisis, activities once closed for the entire month of August stay open more and more often for the first and the last weeks of August.

For, however, this shining day dedicated to profound R&R (and often for a few days before and after) pretty much everything in Milan and many Italian cities except basic fundamental services, such as ERs and basic patient care in hospitals, closes down.

Caveat...viator.

So, if you're in Italy, today you just might have loads of time on your hands. Just the right moment to start a new needlepoint, or cross-stitch, project!

I copied-and-pasted this freebies Microsoft image [(MC900239414), thanks Microsoft!] into StitchPainter, having first sized the image to fit nicely into the upper half of an 8 1/2 x 11" frame (if you work on 18-point) with space at the bottom for a quote of your choice...all for your free personal non-commercial stitching pleasure on this lovely relaxing day.

Oh...and the economic crisis? TV economy journalists have said this morning that the worst just might be over in Europe: 17 of 28 countries posted news about a small, but encouraging, growth. If we get more growth, however small, next trimester, too, the good trend strengthens. Let's hope!

Enjoy!

Sunday, August 4, 2013

More summertime stitching fun!

Still getting my next project together...it's SO hot, here!...but am thinking of you!

Here's something for you thanks to the free Microsoft clipart image (MC900438099). I imported it into StitchPainter for your personal non-commercial stitching pleasure!

Enjoy!

Friday, July 12, 2013

Summertime gardening

Summertime snuck up on me! "What could be a happy summertime image for my needlepoint blog fans that I haven't already done?," I asked myself. VoilĂ ! A simple, strong and beautiful graphic that not only opens my heart, but also should be fun for gardeners, whether for oneself, or as a gift....More......

This particular style is already so clear and simplified that all you have to do is open the image in a simple graphic program (I always use "Paint" for this, for example), select it all, copy it, open that marvie program StitchPainter, and paste it. If it turns out too small, or too big, for your needs, remember that, once you open StitchPainter, you can pre-select the area for the image prior to pressing "paste"...see previous messages about working with this wonderful program. Change the colors of the flowers and the gardener's skin, as you will.

When I saw how dark the colors were in the default version with the grid visible--nothing like the original bright and cheery ones--I decided that it also was a good moment to show you the difference between the onscreen StitchPainter image with the grid on and with it off, and how to do it.

In StitchPainter, with a file open, click on "Layout," and look for the menu entry "Show grid." You'll see it with a check next to it because the default of this toggle menu item is "on." To turn the grid off, just click on "Show grid," and the check will disappear (I did this to generate this image). When you're done checking the image, turn the grid back on simply by repeating the process, and the check will reappear.

Oh, want to share your beautiful designs with friends who don't have StitchPainter? It's easy, and works for the image whether with the grid on, or off.

With the StitchPainter file open (with the grid turned on, or off, as you choose), click on File then Export Document, then on the file form of your choice (I use .bmp). This will save a copy of your file in a format visible by others, but it is a good idea to put a quick notation for the file form at the end of the file name (example: "-bmp") using DASHES NEVER PERIODS (because periods are used to separate the indication of the program type from the file name). Why? Because when you look in your folder with "explore" or as a directory tree in the Microsoft systems (or however you do it with your Apple systems), the two files will be more easily distinguishable one from another.

Thanks, Microsoft, for this (MC900150103) free graphic, that I imported into StitchPainter, and turned into a needlepoint design for your personal, non-commercial stitching pleasure.

Enjoy!

Monday, June 10, 2013

A sneak peek at my next project...what are you doing?


After a long and exhausting, but satisfying, slew of work, my first thoughts were "read" and "needlepoint". As for the first, I'm towards the end of a long, but delightful series of books, and miss the characters like friends, when I'm not reading (a good sign of wonderful books, don't you think?).

What about needlepoint?

...More...... Here's a sneak peek at my next project.

I found, copied and pasted the image, as previously described in this blog. Last night, I finished blocking out the inscription. I still have to put in the details of the border, and then double-check everything before printing and getting started, but the yarns already are sorted, and the canvas has been picked out, so I'm starting to get excited. When it's done, I'm thinking that I'll turn it into a hanging on two rods. I haven't done that before, and it might be very nice with this particular piece.

How about you? What are you working on?

Sunday, April 28, 2013

Exploring Stitch Painter: today, we're finally pasting, yeah!


O.K., so we tackled choosing the right family photo, then sizing it.

Now, we're finally ready to get out our two kinds of virtual Stitch Painter paste jars (Paste, Paste Special), yeah!

...More......
First step? Using your favorite graphic program, or PAINT, open the image you previously chose, prepared and sized, and, going to the MODIFY/EDIT menu, choose SELECT ALL (this will cause a line of dashes to surround your image, as seen in the next illustration; you also can use the SELECT tool, the icon is a box made up of little dashes, to choose only a part of an image to copy and import).


Second step? Return to the MODIFY/EDIT menu, and choose COPY. This copies the image temporarily to your computer's "clip board," that is, a temporary work space (beware, copying something else to the clipboard will replace what you previously copied to the clipboard, and, when you shut off your computer, that memory goes kaputt, so if you want to save the image permanently, you'll need to use the SAVE commands in the FILE menu, and choose a folder in which to save it.)

Technically, at this point you could close the PAINT program, but I tend to minimize it (by clicking on the little underscore bar in the little box in the upper right hand corner of your computer screen), just in case something didn't go right, and I have to copy it, again.


Now, open Stitch Painter; the program opens with a file ready with the default settings. Using Stitch Painter's normal EDIT-PASTE command and without clicking anywhere in the document, the BMP image you import will be pasted "as is" into the existing file, starting from the upper left hand corner. If the existing file is smaller than the image being imported, the document size automatically will increase, but the reverse is not true, as you can see from this example: importing an image smaller than the default file size does not automatically shrink the document size to fit the image size. (This sometimes comes in handy.)

Our image that we imported measures 325 x 212 pixels, that is, 8.60 x 5.61 cm / about 3 1/3" x 2 1/4". As you can see the image turned out so small, that the details are lost, and the people are hardly recognizable. The overall size is pretty small, too, unless you're needlepointing a credit card case! So, what to do? You have a few choices, each offering different results that might be fun to play with.


You can use the SELECT tool (the dashed line box) of the Stitch Painter menu to select an area of the Stitch Painter document, then click on EDIT then PASTE. I purposefully chose an area dissimilar from the shape and size of the image to show you that you can use this feature to play with your designs, too, it's an easy way to elongate in either direction. If, using our handy instructions of last time, you already know the total size of the Stitch Painter document, you can set it using FILE-SET DOCUMENT SIZE, as explained in the earlier message, then select all (by clicking and dragging the select tool over the whole file, or by clicking on EDIT-SELECT ALL, then paste by clicking on EDIT-PASTE.

The other option is to use the PASTE SPECIAL feature in the EDIT menu because this automatically equates one pixel with one stitch, so the overall size of your document will depend not just on the total number of pixels/stitches, but also on the grid/stitch size you set before, as explained in the previous message.


With your fresh default file open and without clicking anywhere in the document, if you click on EDIT then PASTE SPECIAL, it looks like the image imports entirely (in the case of our sample image, GIGANTICALLY), enlarging the file size to fit, but when the import process is finished (it must have been too much for my video card, the screen flickered ominously, but don't be scared...nothing happened), and you go to save the file, it will save only that portion of the image that fit into the specified size of the file, as you can see in this sample. The image sample is so big (remember, it's 325 pixels by 212 pixels) that, without selecting any area, only the small upper corner of the image was actually imported.

Oh dear! How to get the whole thing into the Stitch Painter document so we can make a design out of it? ... By selecting the correct area before doing EDIT-PASTE SPECIAL, that's how!


Here the file is 325 x 212 units to accommodate the 325 x 212 pixels image. In Stitch Painter, I first did EDIT-SELECT ALL, then EDIT-PASTE SPECIAL, and voilĂ ! (If you select an area that is dissimilar to the area of the image, you'll get a distorted image, just as with the PASTE command...something that might be fun to play with!)

Since I work on a 3 x 3 grid to get as close to the WYSIWYG for 18-point, the ultimate size of this design and needlepoint is about 9 1/2" x 6 1/4" / 24.4 cm x 19.93 cm. Looks great, no?!

But what if you need to retouch the imported image before being satisfied with it as a needlepoint, cross-stitch, or knitting design?

O.K., O.K., we'll tackle that in a future post. In the meantime, practice, practice, practice and...

Enjoy!

P.S., like the opening glue bottle? I imported the free Microsoft Clip Art image, MC900094695, into Stitch Painter, and created the file, then exported it as a BMP to share with you for your personal non-commercial stitching pleasure, thanks Microsoft!

P.P.S., the "hide-more" command to give just a first few lines on the first page of the blog has stopped working, so I've taken it out. Will try to put it back in later, thanks!

P.P.S., trying the "hide-more" command, again, please be patient, thanks!

Friday, April 26, 2013

Exploring Stitch Painter: calculating the sizes of images, designs and grids


We're tackling importing images into Stitch Painter, remember? To refresh our memories, in the previous message, we looked at how to choose an image of family members to needlepoint, cross-stitch, or even knit. The upshot was: (1) keep the background simple, or be prepared to get out your digital eraser, and (2) well-lit faces close to the picture plane and to each other are more visible and engaging. One final thought: the less fussy the clothes and hairdo, the less fussy and distracting the design will be.

Now what?

I know you're all chomping at the bit to create your needlepoint, cross-stitch and knitting designs, but hold your horses! There's something else we have to keep in mind, even before clicking on the "paste" button: size....

...More...... O.K., two things: overall size of the project and the size of the individual stitches.

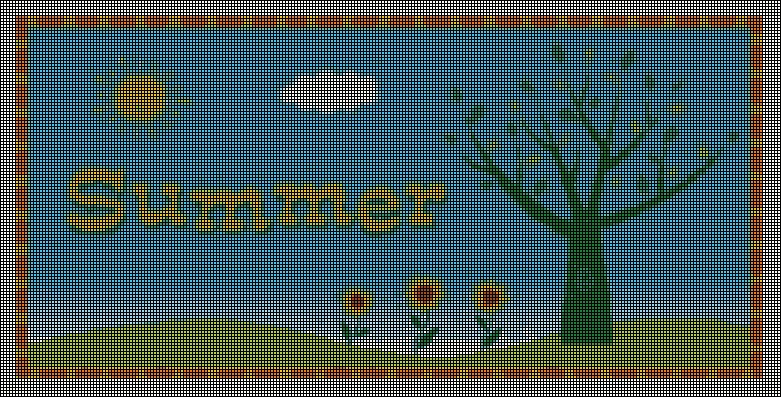
The family portrait we chose last time measures 325 pixels wide by 212 pixels high. By now, most of us probably know what pixels are, but a word now will save us from confusion later. A pixel is a tiny dot/unit of color, so tiny that, all together on our TV screens, for example, they blend into swathes of color. The key word for Stitch Painter here is "unit," you'll soon see why.


My first question to you is, on what point, or mesh count, of canvas do you work? For newbies, that means the number of points, or stitches, in a linear inch of the canvas. The canvasses available go from 8-point (which has "huge" holes...this must be for the tapestry yarns) up to 24-point (which has holes sooooo teentsy that it would be considered "petit point" / "little point"). I work on 18-point...it's small enough to allow for very good detail in a reasonably small space, but isn't so small that I fear I'll never finish what I start. (There are different kinds of canvasses, too, and some of them even allow you to mix stitch size in one piece, but let's leave that out of the already complex equation, at least for the moment.)

Back to the dimensions of the picture we chose, for some practical examples.

Think of each pixel of the image as corresponding to a stitch, so an image measuring 325 pixels by 212 pixels that is stitched on an 18-point canvas would end up measuring about 18" x 12" (325 divided by 18 = ca. 18; 212 divided by 18 = ca. 12). If you work on 16-point canvas, it would end up measuring about 20 1/3" x 13 1/4". If you work on 14-point canvas, it would end up measuring about 23 1/4" x 15". If you work on 12-point canvas, it would end up measuring about 27" x 17 2/3". If you work on 10-point canvas, that's the easiest one, just move the decimal point one space to the left: 32.5" x 21.2". Hopefully, there are two things that are beginning to whirl in your mind:

(1) given the same pixel size of a picture and counting one pixel as one stitch, the bigger the yarn is, the fewer stitches per linear inch there are, the smaller the mesh count is, and the bigger the image is, and...

(2) if you want to make the image fit into a specific size (for example, an 8 1/2" x 11" frame), you're going to have to do some math and image re-sizing, first.


Let's run first through two examples of doing the math.

For working a 10-point canvas for an 8 1/2" x 11" frame, multiply 8.5 x 10 = 85 and 11 x 10 = 110. Your final stitched product will be 85 stitches x 110 stitches. So, your needlepoint design needs to be 85 units x 110 units.

For working an 18-point canvas for an 8 1/2" x 11" frame, multiply 8.5 x 18 = 153 and 11 x 18 = 198. Your final stitched product will be 153 stitches x 198 stitches. So your needlepoint design needs to be 153 units x 198 units.

Two words to the wise before we finish the math.

Keep the final product in mind, part I. If you intend to frame, or sew up, your project, add at least 2 units to each of the measurements so you get two extra rows around your design. You'll need these to go under the frame lip, or into the sewn seam. (A word to the wise: NEVER put your needlepoint behind glass...it squishes the stitches.)

Keep the final effect in mind, part II. If you're making a cushion or furniture upholstery, you're going to be stuffing it. If you're framing it (as opposed to, say, making a table runner, or a bell pull), it's still a good idea to add a bit of padding. To accommodate for the puffy effect thanks to a bit of stuffing, you'd better add at least two more units/stitches/rows.

So, for an 8 1/2" x 11" frame, our 18-point design should be a minimum of 153 + 2 + 2 =157 units/stitches by 198 + 2 + 2 = 202 units/stitches, better yet, 115 because it's easier to center and plan designs if the units are uneven because you'll have a center row, so make that 203.

Yeah! Now, you can open your Stitch Painter program, and start setting up your file!


When you open Stitch Painter, it opens with a file all ready; the size of the file and the grid are set to the defaults. First thing to do? SAVE! Click on FILE then on SAVE AS (note that the first time you save the file, "save" is grayed out)...


...and choose your folder and file name in the normal way, then click on SAVE. Note that you can save the file only as a Stitch Painter file (.stc). (Don't worry, it's possible to export the document as a handful of other file types, one of which is bmp, but that's a lesson for another day.)


Now that you have a file saved, and have figured out the correct units/stitches per inch for your design / project, let's set the document size, first by clicking on the FILE menu, then on SET DOCUMENT SIZE.


Here's where you input the width and length of your finished piece, then click on OK.


Now, you need to set the grid size. This is where you tell Stitch Painter how big you want the individual units (canvas holes) to be. If you're designing for needlepoint, or cross-stitch, these two numbers need to be the same. If you're designing for knitting, you can make the height of the grid unit taller than it is wide, so that the design more resembles the final product. On the LAYOUT menu, choose GRID.

For the moment, this isn't as simple as choosing "10-point," "12-point," or "18-point," for example, though I have suggested to them that they do this. There is at least one reason why this won't be easy peasy for the programmers to do: because the output, whether visual or printed, depends not just on the program, but also on your set-up: the dpi (dots per inch) of your printer (I've read that most have a default of 360 dpi) and the settings of your computer screen.


After experimenting to get as close to a WYSIWYG (What You See Is What You Get) for my set up, a grid size of 3 x 3 prints out only a hair smaller than the 18-point canvas I use, so that's the grid setting I always choose. Experiment with your own set up, then enter the figures that work for you. To finish, click on SAVE. (I've never needed to change the grid line size, but here's where you'd change that, too.)


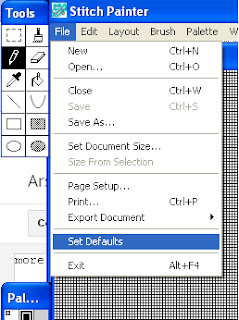
So, now your document is created and sized, and you've chosen the size of the grid. Don't want to go crazy doing this each time? You can tell Stitch Painter to use the settings of the current file as the defaults of all the files that it opens from now on (until you re-set them!) by clicking on FILE then on SET DEFAULTS.


Don't want to go crazy designing on such a small onscreen grid? No problem! You can change what you see on the screen without changing the size of the grid just by zooming! Choose LAYOUT then SET ZOOM FACTOR. Note that the size of the grid behind the menus is quite tiny because the grid is set to 3 x 3. Move the mouse to the next sub-menu, and choose your zoom factor to make the grid appear bigger, or smaller, on your screen. The act of choosing the new zoom factor will change the visualization and close the menus at the same time.


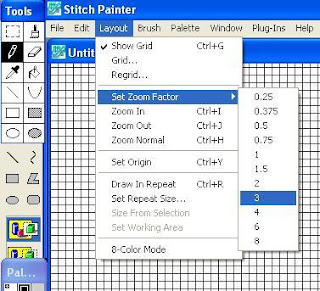
AFTER having chosen to enlarge the grid visualization by a factor of three (three times as big), I went back to capture the onscreen image, to show you the difference in the grid size.

So, you've chosen your image, created a Stitch Painter file, and set the document size and grid factor. You're ready to import an image, right?

Maybe.

You still might need to re-size your image to fit.

If you're handy with the computer, use your favorite program, and we'll chat, again, soon, about actually importing images into this marvie program, Stitch Painter. If, on the other hand, you need a bit of help re-sizing the image before importing it, see below.

Gosh, so much to do, and we haven't even got to the fun stuff, yet. Don't get discouraged! Once you have begun to think like a designer, you'll get used to it, it will get easier, and then you'll find out how much fun it is to create your own designs. I hardly ever use pre-fab designs, anymore. Designing is half the fun!

Enjoy!

P.S., the ruler image is a free Microsoft clipart, MH900386968, while the math dog is based on another free Microsoft clipart, MC900281219. Thanks, Microsoft! All other images are mine. All images are only for your personal, non-commercial use, thanks!


RE-SIZING IMAGES WITH "PAINT"

Paint (which has nothing to do with Stitch Painter) is a simple, but powerful program that comes packaged with lots of computers, so I'll use it to give you some hints. If your program is different, the steps probably are similar.


If you need to make your image bigger, or smaller, you can do it using the command "elongate" (I'm translating from my Italian version, the actual menu name might differ) found in the "Image" menu. Other programs may call the menu something like "Modify," and call the action something like "resize," for example.


Once you open the "elongate" action menu, you can enlarge the whole image by attributing to it a size that is more than 100% (i.e., the current size), or you can reduce the whole image by attributing to it a size that is less than 100%. (Just two things, though. It you change the size of the image, whether you enlarge it, or reduce it, that new size becomes the new 100%. Furthermore, enlarging or reducing a low-dpi image too much makes it fuzzy.)

In my experience, it works best to reduce, or enlarge, in stages, and save as you go, so you don't have to dig out the original image, and start all over again. Remember to save the enlarged/reduced file with a name that is different from the original file!

P.S., here are some handy measurements...so you don't have to do the calculations:

--a regular U.S. sheet measures 8 1/2" x 11" = 21.6 cm x 27.95 cm = 864 x 1118 pixels

--a regular European A4 sheet measures 21 cm x 29,7 cm = about 8 1/4" x about 11 2/3" = 840 x 1188 pixels.

P.P.S., the "hide-more" command that allows me to put just a few lines on the first page of the blog has stopped working. I'll try to put it back in, later, thanks!

P.P.P.S., trying the "more-hide" command, again...please be patient, thanks!

Saturday, April 20, 2013

Exploring Stitch Painter


Promises, promises, promises...finally fulfilled! At least partially!

Since the opening of this blog about three (gulp!) years ago, I have been meaning to walk you through the process of importing an image into Stitch Painter, and turning it into a diagram for your needlepoint, or cross-stitch projects.

The day finally has arrived.

I know, I know, you're shocked.

To keep from overwhelming you (and me), we'll do it in installments. [grin!]...More...... First of all, how do you pick the right image? Unless you've the patience of a saint, whether or not you finish the project probably depends on this, so let's look at a few images, together.

One of the first images that pull at our hearts are those of family, but photographs can be very tricky. Lots of detail (wanted and unwanted) and lots of distractions.


Take this lovely snap of a casual and happy family moment (MH900422784, courtesy of the free images in Microsoft Clip Art, thank you, Microsoft). Why isn't it suited to become a needlepoint design?

The faces are visible, well lit and fairly close to the camera--some of the things to keep in mind--but they are too far apart from each other, and still too far from the viewer. There's lots of distracting background detail, too. A studio snap with a plain background already would be helpful (but might feel too posed), or you can just plan on erasing the background from the photo, before or after you import it. It just takes a little time, but it has to be kept in mind.

Using an image like this (MP48491, thanks, again, Microsoft!)...

...will help you avoid heartache. The background is plain, the faces are identifiable, close to the picture plane, and engaging. All are well lit and turned to the viewer. Finally, the background is quite plain, so even if you decided to needlepoint it "as is," it wouldn't give you extra grief.

So, start rummaging through your photos for a few that inspire you. The next time, we'll confront importing images into Stitch Painter.

Enjoy!

(P.S., the hand--courtesy of Microsoft MP900425546--is gigantic, is now in one of Rome's most important museums, and comes from an ancient Roman statue of the Emperor Constantine, who ruled in the first half of the 4th century A.D. I, ahem, added the string!)

Sunday, April 7, 2013

Sneaking around Milan

You know, by now, that I can't resist some good word play.

So, here are some sneakers to greet spring that finally seems convinced to arrive even in Milan....More...... This year, we've had 60% more rain than usual, so we're all very very ready to have more than a sporadic day of lovely fresh blue skies and happy yellow sun. The weatherman has promised that, after Monday (sigh), some springy weather is on its way, so let's all get out our sneakers, and get ready to go for a nice long walk.

In the meantime, we can celebrate the marathon running through Milan, today, and you might enjoy needlepointing these for the sporty and youthful in your life, or for yourself. If you make the margins bigger, you could add sayings, names and birthdates. It should be good for stitching in honor of a baby's birth, too.

I captured the free clipart image (MC900351201) from the microsoft web site...thank you, Microsoft!..., and imported it into StitchPainter, added the laces, and voilĂ ! Stitching fun time for your personal, non-commercial pleasure.

Enjoy!

Thursday, February 28, 2013

Spring is springing!


Today is the last day of winter, and Milan is going to have glorious weather for the next couple of days, yeah! About time!

To celebrate,...More... ...here's a simple flower basket to needlepoint, or cross-stitch.

I found the free image (n. MC900238146) on Microsoft's web site, captured it, opened StitchPainter, sized the document for a vertical piece big enough for an almost 10" wide and a 10"+ tall cushion (18-point), selected the whole document, used Paste Special, and...voila'!

To share your designs with friends who don't have StitchPainter, do as I did: export the document into a bmp file, it's easy! (just look in the "file" menu)

So, here's my snippet of Spring springing for your personal, non-commercial stitching pleasure.

Enjoy! P.S., what's up with Blogger? The text used to wrap along the entire side of the image, but now it starts only at the bottom, so it looked better to put it a few lines underneath.

Thursday, February 7, 2013

A sweet (non-caloric) gift for Valentine's Day

Valentine's Day is just around the corner.

You've got just enough time to whip up this almost mono-color, but sweet little Cupid for your Significant Other.

Prefer more color? Be creative, and add it, yourself!

I captured the free graphic (MC900304923) offered by Microsoft (thanks!), imported it into the marvie program StitchPainter, and turned it into a design for your personal, non-commercial stitching pleasure.

Enjoy!

Saturday, February 2, 2013

Can YOU see your shadow?

I have adored Groundhog's Day ever since I saw the Bill Murray film. He's such a delight, and infused that comedy with real meaning.

In honor of the day, here's...
More...... ...a sweet little groundhog, easy to stitch, which I created for your personal non-commercial stitching pleasure by capturing the free Microsoft graphic (MC900301420), and then importing it into the marvelous StitchPainter program.

Because the original graphic was so simple (that's a hint for you, if you want to try your hand at designing your own stitching projects, especially if you're new to it), I didn't even have to tweak the results at all.

Enjoy!

Tuesday, January 1, 2013

Happy New Year 2013!

May the new year bring you serenity and joy.

Happy New Year 2013!

(Thank you, Microsoft, for your free clipart #MC90059275, that I uploaded into StitchPainter to create this design for stitchers' personal non-commercial enjoyment.)
Related Posts Plugin for WordPress, Blogger...