Showing posts with label Drawing. Show all posts

Sunday, July 18, 2010

It's a draw


Want to do your own needlepoint design, but you’ve never drawn a thing in your life, and you’re too scared even to try? Having managed to get over the fear of the blank page, you took the plunge, but your untrained hand and eye are too inexpert to get even close to what you have in mind? Using...More......a simple (and often freely pre-loaded) graphics program, such as Microsoft’s “Paint,” could help liberate you. If you aren’t able to do even simple geometric shapes—necessary for giving your design solid believable structure and proportions and for setting it convincingly in space—using just such a program is a must. If you have a bit of familiarity with using menu-driven programs, then you’ll have no trouble learning how to use Paint…just play a bit at first, and learn while playing.

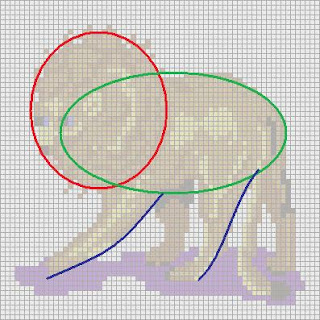
When I do designs freehand, even when inspired by images in other books, I, too, establish the principal forms using geometric shapes, first, as you can see in this after-the-fact mock-up. My original design for the lion, featured in the “composite” design and inspired by that marvelous E. Bradley book on Victorian needlepoint, was done long ago, and I didn’t save the first version with the geometric shapes.

This image was created using a washed-out image of the gridded StitchPainter image, so you can see how the geometric shapes relate to the final design, as featured in my blog post of July 11, 2010 (http://arsacupicturaestellae.blogspot.com/2010/07/king-of-beasts-5-of-9.html).

Do the initial geometric shapes in a bright easily visible color that will not be a part of your final design. It will make it easier to distinguish the initial geometric shapes from your desired shapes (and replace them, bit by bit, with the desired colors), as you elaborate the drawing.

Once the drawing is done, you can print it out, and trace the design directly onto your canvas (see my post: “Designing: transforming your photos into a needlepoint design…start simply!,” dated July 4, 2010). If you need to import it into your needlepoint gridding program, that’s stuff for another blog post.

Sunday, July 4, 2010

Designing: transforming your photos into a needlepoint design...start simply!


Even if you have a needlepoint program, and especially if you've never taken art lessons, it's a good idea to start doing your own designs by...More......tracing over a photo. Why? because it helps you concentrate on the STRUCTURE of the object in question, a fundamental feature to achieve convincing results, as opposed to being bewitched by small details. It also helps you realize just how complicated translating a photo into a design is, so it helps you learn to pick images that better lend themselves to this transformation.

In this photo I snapped a couple of years ago, I outlined for you the principal structural parts of the flower, stem and leaves (choosing to leave out the smaller leaf in perspective, as it would be harder to understand in a needlepoint). The larger areas of shadow and light also have been outlined because they are indicative of structure. Smaller details, such as teeny defects in the lips of the petals, were ignored. If you have a spare copy of the photo, you can outline directly on it. If you don't, and if there's nothing confusing on the other side of the page, you can put the photo up against a sunny window, put a piece of tracing paper over the photo, and trace on the tracing paper. Once this is done, set down the photo, put the traced design against the sunny window, and your canvas over the traced design. KEEPING STITCHING TECHNIQUE IN MIND, trace the design in pencil, or waterproof felt-tipped pen (beware that dark colors of pen might show through a light-colored yarn!).

What do I mean by keeping stitching technique in mind? See my post and diagram on stitching techniques.

Saturday, July 3, 2010

Designing: places to start


So, you want to make a needlepoint. You even have an idea about what it will become after being finished, AND you know to whom you'd like to give it. These two things already will...More......influence the design, itself. Let's say you've even settled on a subject, and have an idea about how you'd like the composition to be. Where to turn, next, in the absence of a pre-fab kit? Though a perfectly viable alternative--one got me hooked on needlepoint after all!--as I've mentioned it's so much fun to design one's own.

Looking through books of needlepoint patterns helps (if you're a beginning, I'd put off translating complicated images, such as a photo of your kid with his/her first b-day cake smeared everywhere but in his/her mouth).

Start with something simple, such as this little hand-done Xmas tree. If you have trouble drawing, then get yourself a kid's coloring book with the desired images in it, or hunt on the web. Once you have the image you want, you can trace it directly onto your canvas WITH A PENCIL, OR A WATERPROOF PEN, up against a window, in absence of a light box. It's a bit tiring, but works great.

Always remember to figure your initials and the year into the design from the very beginning!
Related Posts Plugin for WordPress, Blogger...